Showing posts with label natural food coloring. Show all posts

Friday, February 13, 2009

Healthy Valentine's Snacks

One of my favorite things about eating more naturally is making special treats on holidays. I had so many exciting plans for Valentine's Day this year, only to have my entire family get hit with the flu this past week. (Yes, even though we eat healthy, we still get sick sometimes!) Yesterday I managed to put a couple of my plans into action, and the rest will have to wait until next year.


Tomorrow, my kids will be eating Heart-Shaped Chocolate Covered Marshmallows and Frozen Strawberry Cream Hearts.


To make the marshmallows, I used the Agave Marshmallow recipe from Volcanic Nectar, but also added a bit of natural pink food coloring, then spread the marshmallow creme onto a large, rimmed cookie sheet rather than a 9x11 pan. After they were set, I used heart shaped cookie cutters to cut out the hearts. (Make sure to wet the cookie cutter in warm water before cutting for a nice, clean cut.)


Then, I made the chocolate coating. Inspired by Lauren of Healthy Indulgences and her ice cream bar chocolate coating, I melted 8 Tbsp. grain-sweetened chocolate chips with 2 Tbsp. extra virgin coconut oil and a shake of stevia powder. (This coating is amazing!) Once it was all melted and cooled, I dipped the marshmallows in and then laid them on foil and refrigerated them until the chocolate hardened. I used a knife to gently pry them off the foil and placed them in a sealed container until tomorrow.


To make the frozen strawberry hearts, I used the recipe for "Frozen Strawberry Cream" from Jeffrey Goettemoeller's Stevia Sweet Recipes cookbook. This is one of my favorite uses for stevia. This is a quick and simple ice cream recipe (you don't need an ice cream maker to make it), but this time I poured the mixture into this cute heart-shaped gelatin mold that my mother-in-law recently gave me.


It took about 4-6 hours for the mixture to freeze, then I unmolded them and put them in a container. They'll stay in the freezer until tomorrow night's dessert! (They need to be removed from the freezer one hour before serving so that they're soft enough to eat.)

Happy Valentine's Day!


Wednesday, January 9, 2008

Bug Birthday Party


Toosht's 2nd birthday is coming up this weekend, and I'm remembering the bug-themed party we threw for him last year. DH and I spent a couple of hours the night before the party decorating each bug cupcake uniquely with our naturally colored frosting. We used Panda licorice pieces for the bug heads. The cupcakes themselves were made using Martha Stewart's chocolate cake recipe (plus my modifications). We cut off the tops of the cupcakes, split the tops in half, and then put them back on the cupcake bases to resemble wings. To do the dots and lines with the frosting, we cut off the corners of plastic sandwich bags and squeezed the frosting out through the holes.


We also did a batch of cupcakes that were frosted normally, with white cream cheese frosting, and then we placed pretend frogs and bugs on top of them. I sewed a very simple tablecloth to add to the theme.


There were hors d'oeuvres too. We served ants on a log (celery topped with peanut butter and raisins), caterpillars (jack cheese, grapes, and carrots for the antennae), and lady bugs (dates and cherry tomatoes).


This was such a memorable party (for me, anyway!). It was so much fun preparing all these buggy treats in celebration of my precious little guy's first year of life.

Friday, October 12, 2007

Lil' Pumpkin Cakes

Last year we started what I hope will be a new tradition, when we ate cute mini pumpkin cakes after our trip to the pumpkin patch. It was the perfect way to end our lovely autumn day.


These cakes are so much fun to make! To get the round pumpkin shape, I used the mini fluted stoneware pan by Pampered Chef (which I don't see on their website right now, so I don't know if it's available any longer). However, you can use any mini-bundt style pan, or use two regular sized bundt pans and make one big pumpkin cake. You may need to adjust your baking time for larger cakes.

Lil' Pumpkin Cakes

1 1/2 c. agave nectar
1/2 c. unsweetened organic applesauce
1/2 c. cold pressed olive oil or organic virgin coconut oil
1 tsp. vanilla
2 cups canned pumpkin
4 eggs
2 c. unbleached flour
3 tsp. baking powder
2 tsp. baking soda
1/4 tsp. sea salt
2 tsp. ground cinnamon

**Cream cheese frosting and natural orange food coloring (see Jack-O-Lantern cookie post for frosting recipe)

**Cinnamon sticks and fresh mint leaves for decoration.

Directions:

Preheat oven to 350 degrees. Grease and flour mini-fluted pan. Sift together the flour, baking powder, baking soda, salt and cinnamon. Set aside.

In large bowl combine agave, apple sauce and oil. Blend in vanilla and pumpkin, then beat in eggs one at a time. Gradually beat in flour mixture. Spread batter into prepared pan/pans.

Bake in preheated oven for 30-40 minutes, or until a toothpick inserted into the center of the cakes comes out clean. Allow to cool.

After cakes have cooled, place one cake upside down and spread a good layer of frosting on the flat part that is facing up. The frosting should act like glue so that when you set another cake right side up on top of the first cake, they will stick together. Then frost over the "pumpkin" shape until covered as desired.

Cut a cinnamon stick into small pieces and stick into the center of each cake to make the "stem." Garnish with fresh mint leaves for the "vine."

Happy baking, and Happy Fall!

Thursday, October 4, 2007

Natural Food Coloring

As I mentioned in the Jack-o-Lantern post, I use Seelect natural food coloring for all of my special baking projects. I was so thrilled to find these food colorings. Before I found them I was trying to make my own food coloring, which was fun, but time consuming. For instance, I boiled beets to get a red liquid which, when mixed with my cream cheese frosting, created a nice pink color for Valentine's Day cookies.

I do need to say that if you're expecting natural food coloring to work the same way artificial food coloring works, you will be disappointed. The colors are definitely not as bright, and they don't mix with each other the way the artificial ones do. If you try to mix natural blue and natural yellow, you won't get green. Trust me, I've tried!

But if you are looking for a healthy alternative to artificial food coloring, and are open to a more natural look on your baked goods, you will be very pleased. I've frosted lots of cakes, cupcakes and cookies with natural colors, and they look great and bring joy to my boys' faces, which is what matters most to me. Plus, I know I'm not feeding them chemicals in their birthday desserts!

In my experience, the best Seelect colors are Yellow, Orange, and Red/Blue. I have tried the Blue, but it has always looked like a very dull purple for me. The Red/Strawberry has also turned out too dull for me, looking like a light brownish pink. Yellow is very true yellow and works great. Orange is also very true and I use it a lot in the fall for all my pumpkin-y treats. The Red/Blue doesn't end up looking red, but it does create a pretty darkish, bright purple color (I've found that this one looks prettier if the frosting sits in the fridge overnight). I have yet to try Brown and Red/Pink, but am curious about how they would work. I haven't found a good Green either, though I've tried by boiling spinach and other veggies! Still working on that one...

Over the next couple of months I'll be posting pictures and recipes for a few of the natural food coloring creations that I've done for my boys' birthdays and for other holiday celebrations, so be sure to check back!

Monday, October 1, 2007

Jack-O-Lantern Cookies

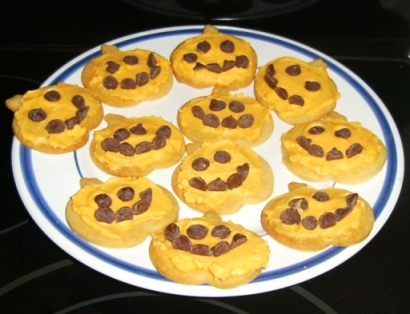
October is here! This time of year I start thinking about the great scents and tastes of the season. Pumpkin is one of my favorites. I enjoy coming up with special treats for my family to match the time of year. Last year I made these jack-o-lantern cookies and will most definitely make them again.


To make the cookies, use the Sugar Cookie recipe from Sweet Savvy and cut them out with a pumpkin shaped cookie cutter. Once you have baked the cookies, you can use any frosting recipe you like. I prefer to use a simple cream cheese/butter recipe:

Cream Cheese Frosting

8 oz. cream cheese
1/2 c. butter, softened
4 T. honey or agave
1 t. vanilla

Beat cream cheese and butter until fluffy. Beat in honey or agave. Add vanilla.

Color the frosting to your liking using Seelect Natural orange flavoring.

You can frost the cookies and leave them as plain pumpkins, or you can use grain-sweetened chocolate chips to create the jack-o-lantern faces.