Showing posts with label dessert. Show all posts

Tuesday, October 27, 2009

Healthy Wheat-free Pumpkin Cakes

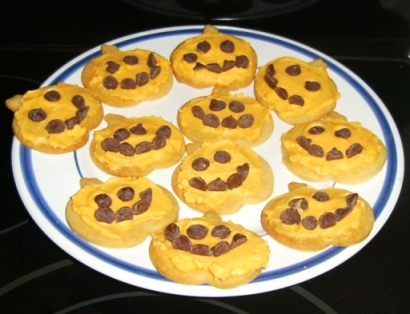
These super-moist, healthy pumpkin cakes will be sure to please your kids! They are wheat-free, refined sugar-free, and yet they still manage to fill the kitchen with the delightful scent of autumn baking, and to satisfy tummies with the pleasant pumpkin taste that goes with the season. My kids enjoy turning their cakes into jack-o-lanterns by adding chocolate chips.


Healthy Wheat-free Pumpkin Cakes

4 eggs
1/3 c. agave nectar
1/4 tsp. stevia powder

1 c. extra virgin coconut oil
1 (15 oz.) can pumpkin puree
2 cups barley flour
2 tsp. baking powder
1 tsp. baking soda
2 tsp. ground cinnamon
1 tsp. salt
** grain-sweetened chocolate chips (optional)

Pre-heat oven to 350 degrees.

In a bowl, mix the eggs, agave, stevia, oil and pumpkin with a mixer until well-blended. Slowly add the flour, baking powder, baking soda, cinnamon and salt, stirring until thoroughly combined.

Spread the batter evenly into a large ungreased baking pan (I use a
15-inch x 10-inch x 2-inch Pyrex baking dish, but two smaller dishes could also be used).

Bake for 25 minutes. Cool, then use pumpkin-shaped cookie cutter to cut pumpkin cakes. Add grain-sweetened chocolate chips for jack-o-lantern faces.

Note: These can also be cut into bars and/or topped with a cream cheese frosting (try tinting yours with some natural orange food coloring).


Sunday, January 13, 2008

Sand Cups for a Pirate Party


For Toosht's 2nd birthday yesterday, we had a pirate theme and I made Sand Cups for the dessert. I used chocolate pudding for the bottom layer, a homemade version of Cool Whip (my sister's recipe) for the middle layer, and crushed Barbara's Vanilla Snackimals animal cookies for the top "sand" layer. Colorful paper umbrellas were the finishing touch. I thought the Sand Cups were great, but they seemed almost too sweet to me. In the future a variation I may try will be to use plain whipped heavy cream rather than the Cool Whip recipe. It was rich and sweet and maybe didn't need to be so sweet with the already sweet chocolate pudding and crushed animal cookies. My boys and my guests didn't seem to mind the sweetness, however!

CHOCOLATE PUDDING

2 cups whole milk
1/2 cup agave nectar
1/3 cup cocoa powder
4 teaspoons arrowroot powder (or cornstarch)
3 large egg yolks
2 teaspoons pure vanilla extract
1/4 teaspoon sea salt


Sift (so as to avoid clumps) the cocoa into a saucepan, then add 1 1/2 cups of the milk and the agave. Bring to a simmer, over medium-high heat. Remove from the heat.

Meanwhile, whisk the remaining 1/2 cup of the milk, arrowroot powder, salt, egg yolks, and vanilla in a bowl. Gradually whisk the hot mixture into the egg mixture. Return to the saucepan and cook over medium-high heat whisking constantly, until the pudding comes to a full boil. Reduce the heat to maintain a simmer, and continue whisking until thick, about 2 or 3 minutes more.


Pour the pudding into 6 small cups. Cover with plastic wrap and refrigerate for at least 4 hours or ideally overnight until set.


(Note: I doubled the pudding recipe in order to have enough for everyone at the party.)


HOMEMADE COOL WHIP


1 c. heavy cream, whipped
10-12 oz. cream cheese, softened
1/2 c. agave nectar


Cream together cream cheese and agave. Add the already whipped heavy cream and mix until combined. Chill until ready to use.


A note about Barbara's Snackimals... the only flavor without cane sugar is the Vanilla flavor.


Wednesday, January 9, 2008

Bug Birthday Party


Toosht's 2nd birthday is coming up this weekend, and I'm remembering the bug-themed party we threw for him last year. DH and I spent a couple of hours the night before the party decorating each bug cupcake uniquely with our naturally colored frosting. We used Panda licorice pieces for the bug heads. The cupcakes themselves were made using Martha Stewart's chocolate cake recipe (plus my modifications). We cut off the tops of the cupcakes, split the tops in half, and then put them back on the cupcake bases to resemble wings. To do the dots and lines with the frosting, we cut off the corners of plastic sandwich bags and squeezed the frosting out through the holes.


We also did a batch of cupcakes that were frosted normally, with white cream cheese frosting, and then we placed pretend frogs and bugs on top of them. I sewed a very simple tablecloth to add to the theme.


There were hors d'oeuvres too. We served ants on a log (celery topped with peanut butter and raisins), caterpillars (jack cheese, grapes, and carrots for the antennae), and lady bugs (dates and cherry tomatoes).


This was such a memorable party (for me, anyway!). It was so much fun preparing all these buggy treats in celebration of my precious little guy's first year of life.

Thursday, December 20, 2007

Mock Toffee

Mock Toffee was my comfort food of choice during the final month of pregnancy, and has also proven to be my comfort food of choice in the postpartum period! I can't get enough of it, especially when I spread cream cheese on in. So delicious! Lately I have been making it without nuts due to some nut allergies in our family, and it's just as tasty without the nuts. Here's the recipe:

Mock Toffee


1 c. brown rice syrup

1/2 c. butter
Midel graham crackers (or homemade)
grain-sweetened chocolate chips

pecan pieces (optional)


1. Preheat oven to 375. Line large cookie sheet with foil, butter heavily; Place crackers side by side to cover cookie sheet.


2. Combine butter and brown rice syrup in a saucepan and heat until they boil and bubble. Pour immediately over crackers; Bake 10-12 minutes.

3. Remove from oven and sprinkle surface with chocolate chips. Allow to sit for about one minute, then spread chocolate around with a spatula until all the crackers are coated. If using nuts, sprinkle over chocolate and press into chocolate with spatula.


4. Allow to cool and harden in refrigerator.


5. When cool, break into pieces and enjoy!

Wednesday, November 14, 2007

A Chocolate Cake Recipe for All Occasions

Martha Stewart has a fantastic chocolate cake recipe that I have altered to fit my family's preferences. This cake can be used to make sheet cakes, frosted birthday cakes, cupcakes and more.

Here are my changes to the recipe:

*Instead of all-purpose flour, use unbleached flour.
*Instead of 3 c. sugar, use 2 or 2 1/2 c. agave nectar (I tend to use the smaller amount and the cake is still plenty sweet).
*Instead of buttermilk, use plain organic yogurt, OR use goat milk, organic milk, or raw milk with an added tablespoon of vinegar.
*Instead of vegetable oil, use virgin coconut oil (high oleic safflower oil would work well too).

I usually use my basic cream cheese frosting recipe when I frost this cake.

Cream Cheese Frosting

8 oz. cream cheese
1/2 c. butter, softened
4 T. honey or agave
1 t. vanilla

Beat cream cheese and butter until fluffy. Beat in honey or agave. Add vanilla.


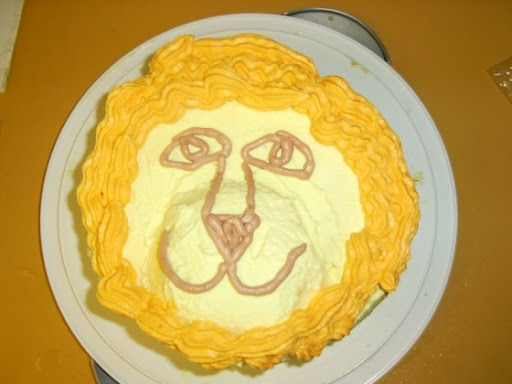
For Tie-Dye's birthday last year I made a lion cake using this recipe. I got the lion idea from Martha Stewart's website as well. She used buttercream frosting to do the lion's face, and licorice for the whiskers. I just whipped up some organic heavy cream, liquid stevia, and natural yellow food coloring for the base of the lion's face and in between the two cake layers, and then used cream cheese frosting for the mane and face.


Tomorrow is Tie-Dye's 4th birthday, so today I will be making chocolate cupcakes. I'm going to try a little experiment and turn them into Chocolate Cheesecake Cupcakes. For the cheesecake filling I will use 6 oz. softened cream cheese, 1/4 c. agave nectar, 1 egg and 1/8 tsp. sea salt. I hope they turn out!

***As a side note I wanted to let you know that my posts may continue to be less frequent than usual this month and next, not only because it's a busy time of year with birthdays and holidays, but because I'm now 9 months pregnant and my baby is due in 23 days! Once the baby has arrived and we're all settled I should be able to resume more regular posts. Thanks for your patience!

Tuesday, October 30, 2007

Another Pumpkin Recipe

Here is another recipe we have been enjoying this season. I like it because you can really taste the pumpkin, and it's so moist.

Pumpkin Bars (aka Pumpkin Cake)

4 eggs
1 c. agave nectar
1 c. virgin coconut oil
1 can (15 oz.) pumpkin
2 c. unbleached flour
2 tsp. baking powder
1 tsp. baking soda
2 tsp. cinnamon
1 tsp. sea salt

Preheat oven to 350 degrees

In a bowl, mix the eggs, agave, oil and pumpkin until light and fluffy. Separately, mix together the flour, baking powder, baking soda, cinnamon and salt. Stir into the pumpkin mixture until thoroughly combined.

Spread the batter evenly into an ungreased 9x13 dish. Bake for 25 minutes in preheated oven.

These can be enjoyed plain or topped with whipped cream cheese, or topped with a cream cheese frosting. Enjoy!

Friday, October 12, 2007

Lil' Pumpkin Cakes

Last year we started what I hope will be a new tradition, when we ate cute mini pumpkin cakes after our trip to the pumpkin patch. It was the perfect way to end our lovely autumn day.


These cakes are so much fun to make! To get the round pumpkin shape, I used the mini fluted stoneware pan by Pampered Chef (which I don't see on their website right now, so I don't know if it's available any longer). However, you can use any mini-bundt style pan, or use two regular sized bundt pans and make one big pumpkin cake. You may need to adjust your baking time for larger cakes.

Lil' Pumpkin Cakes

1 1/2 c. agave nectar
1/2 c. unsweetened organic applesauce
1/2 c. cold pressed olive oil or organic virgin coconut oil
1 tsp. vanilla
2 cups canned pumpkin
4 eggs
2 c. unbleached flour
3 tsp. baking powder
2 tsp. baking soda
1/4 tsp. sea salt
2 tsp. ground cinnamon

**Cream cheese frosting and natural orange food coloring (see Jack-O-Lantern cookie post for frosting recipe)

**Cinnamon sticks and fresh mint leaves for decoration.

Directions:

Preheat oven to 350 degrees. Grease and flour mini-fluted pan. Sift together the flour, baking powder, baking soda, salt and cinnamon. Set aside.

In large bowl combine agave, apple sauce and oil. Blend in vanilla and pumpkin, then beat in eggs one at a time. Gradually beat in flour mixture. Spread batter into prepared pan/pans.

Bake in preheated oven for 30-40 minutes, or until a toothpick inserted into the center of the cakes comes out clean. Allow to cool.

After cakes have cooled, place one cake upside down and spread a good layer of frosting on the flat part that is facing up. The frosting should act like glue so that when you set another cake right side up on top of the first cake, they will stick together. Then frost over the "pumpkin" shape until covered as desired.

Cut a cinnamon stick into small pieces and stick into the center of each cake to make the "stem." Garnish with fresh mint leaves for the "vine."

Happy baking, and Happy Fall!

Monday, October 1, 2007

Jack-O-Lantern Cookies

October is here! This time of year I start thinking about the great scents and tastes of the season. Pumpkin is one of my favorites. I enjoy coming up with special treats for my family to match the time of year. Last year I made these jack-o-lantern cookies and will most definitely make them again.


To make the cookies, use the Sugar Cookie recipe from Sweet Savvy and cut them out with a pumpkin shaped cookie cutter. Once you have baked the cookies, you can use any frosting recipe you like. I prefer to use a simple cream cheese/butter recipe:

Cream Cheese Frosting

8 oz. cream cheese
1/2 c. butter, softened
4 T. honey or agave
1 t. vanilla

Beat cream cheese and butter until fluffy. Beat in honey or agave. Add vanilla.

Color the frosting to your liking using Seelect Natural orange flavoring.

You can frost the cookies and leave them as plain pumpkins, or you can use grain-sweetened chocolate chips to create the jack-o-lantern faces.

Saturday, September 8, 2007

PB (&J!) Cookies

My friend Leah gave me this great natural peanut butter cookie recipe. I made them last night when we had company and they were a hit, as usual!

Peanut Butter Jam Jams

3/4 c. natural sweetener (brown rice syrup, agave nectar, or honey, or a combination - I did 1/2 c. agave and 1/4 c. brown rice syrup)
1/2 c. butter
1/2 c. natural sugar free peanut butter (preferably organic)
1 T. milk or cream
1 1/2 tsp. vanilla
1 egg
1 3/4 c. unbleached flour or whole wheat pastry flour
1 tsp. baking soda
1/4 tsp. salt
Fruit jam or jelly (100% fruit, no sugar added)

Preheat oven to 375 degrees.

Combine butter, peanut butter and sweetener in saucepan and heat until butter is melted. Remove from heat and mix well, adding milk and vanilla. Whisk in egg.

In separate bowl mix together flour, baking soda and salt. Pour butter mixture into flour mixture and stir until smooth and combined.

Drop heaping tablespoons full of cookie dough onto ungreased cookie sheet or stone. Using your thumb, make a gentle impression in the center of each cookie. (If the dough is sticking, try wetting your thumb.) Fill each impression with a small amount of jam or jelly, using a small spoon.

Bake for 10-15 minutes.

Yum Yum!

Tuesday, September 4, 2007

Oreos

This summer Tie-Dye participated in our church's Vacation Bible School week. As is my custom before my kids attend an event, I found out in advance that they would be having snacks in their classroom each evening, most likely cookies. I was a craft teacher for the preschool classes, so I decided I'd pack some cookies for Tie-Dye and then just scope out what kind were being provided for the rest of his class. They were given Oreos and some sort of yellow powder mix drink. The first night, Tie-Dye had the cookies I brought for him and his water. The following day I searched all over for a homemade Oreo cookie recipe and finally combined a couple different recipes and altered some things until I came up with this:

Homemade Oreo Cookies (aka Faux-Reos)


COOKIES:
  • 1 cup agave nectar

  • 3/4 cup unsalted butter

  • 1/2 teaspoon salt

  • 1 large egg

  • 1 tablespoon water

  • 1 teaspoon vanilla extract

  • 3 cups unbleached all- purpose flour

  • 3/4 cup cocoa powder

FILLING:
  • 8 oz. cream cheese, softened

  • 1/2 c. butter, softened

  • 4 T. agave nectar

  • 1 teaspoon vanilla extract

  1. In a medium-sized mixing bowl, cream together the agave and butter. Add the salt, egg, water, and vanilla and beat until smooth. Beat in the flour and cocoa until well combined; the dough should be very stiff.

  2. Roll the dough into balls about the size of a shelled chestnut, or a “shooter” marble - the big marble you use to shoot at the little ones. Place the balls on parchment-lined or lightly greased cookie sheets and flatten each ball until it’s 1/8 inch thick, using the bottom of a glass dipped in cocoa powder. You may also use a cookie stamp, for a more realistic faux-reo effect. To get a nice crisp cookie, it’s important to press them thin use a ruler on the first one so you can see just how thin 1/8 inch is. (If you press them thinner than 1/8 inch, you run the risk of having them burn.) Place the baking sheets in the refrigerator to chill the dough for 30 minutes.

  3. Preheat the oven to 325 degrees F. Bake the cookies for 18 minutes or until done. It’s important to bake them just the right amount of time: too little and they won’t crisp properly; too much and they’ll scorch. Watch them closely at the end of the baking time, and at the first sign of darkening edges or first whiff of scorching chocolate, remove them from the oven immediately: Remove the cookies from the baking pans and cool them completely on a wire rack.

  4. To make the filling: Beat cream cheese and butter in mixer bowl until fluffy. Beat in agave to taste. Add vanilla and mix well.
The batch made a little over 100 wafers, so I could have technically made 50 Oreo sandwiches.

I just made Oreo sandwiches as needed and kept the rest of the plain chocolate wafers in the fridge for DH and the boys to snack on. They loved the cookies both ways.

Also, the recipe says to chill the dough in the fridge for 30 minutes, which I didn't do. The hardest part was pressing them out with the bottom of a glass because sometimes they would stick. I had to keep putting lots of cocoa powder on the bottom of the glass to help them not stick as much.

Tie-Dye was very pleased to have his special Oreos each night. On the second night, immediately after the children finished their cookies and drinks, three different children complained of tummy aches. One boy actually had to lie down and we had to get his dad to pick him up early. This was yet another confirmation to me that the packaged, processed foods our children are exposed to are not good for their little bodies.


Monday, September 3, 2007

Healthy S'mores

In honor of Labor Day, I thought I would share our family's alternative S'mores recipe. This recipe was created two years ago for a 4th of July barbecue and is now a tradition for holiday meals. We've even done these over a barbecue pit at the beach.

Healthy S'mores

Mi-Del graham crackers
Bananas, cut into marshmallow sized chunks
Grain sweetened chocolate chips

Prepare "chocolate bars" in advance by melting grain sweetened chocolate chips on the stove top (a double boiler works best), then pour into a wax paper lined Pyrex dish and refrigerate until hardened. Break into chocolate bar sized pieces.

Roast banana chunks over an open fire or grill on a BBQ until they reach desired doneness.

Piece together your S'more by sandwiching a chocolate bar and a roasted banana between two graham crackers.